
Quick Answer
A failing trailer spider plate (also known as brake anchor plate) typically shows up as uneven brake shoe wear, excessive S-cam shaft movement, elongated or egg-shaped anchor pin holes, visible rust or corrosion, and brake performance issues. Ignoring it can cause not only brake failure but also safety hazards.
What is a Trailer Spider Plate?
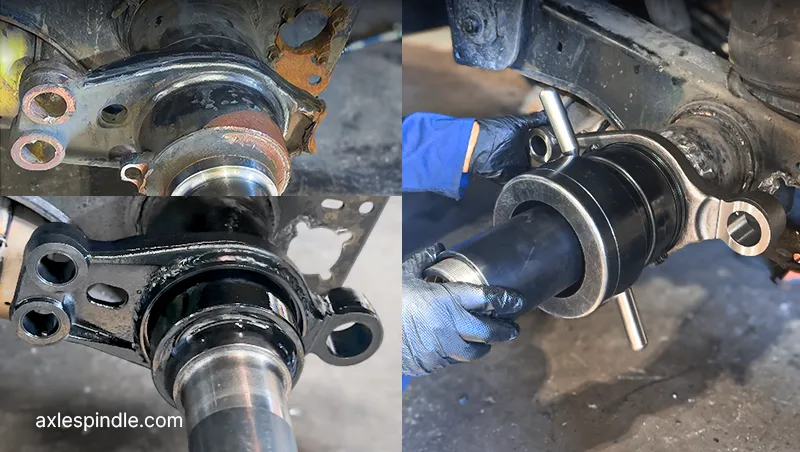
The trailer spider plate is a heavy-duty cast-iron mounting plate welded to your trailer’s axle housing. It anchors your brake shoes, supports the S-cam bushings, holds the anchor pins, and keeps the entire drum brake assembly properly aligned. Nothing moves correctly without it sitting square and solid.
Your trailer brake spider plate is the fixed anchor point for your entire drum brake assembly.
It does four jobs, and your brakes need all four working.
It anchors the brake shoes: Braking force is transferred through the plate to the axle. A cracked or shifted plate breaks that path, and stopping power drops quietly.
It supports the S-cam bushings: The bushings keep the camshaft centered, so both shoes push out evenly. When the plate wears around the bore, you get that clunk under braking.
It holds the anchor pins: Heat and load turn tight round holes oval over time. Once that happens, the shoes lose their pivot, resulting in chatter and uneven retraction.
All components stay aligned: Every brake component is positioned off the spider plate. If it is not sitting square, nothing else is either. That shows up as pull, uneven wear, or longer stops.
Think of it as the foundation of your braking system. If the foundation shifts, everything built on top of it gets thrown off.
5 Signs Your Trailer Spider Plate is Failing
You may notice noise from the trailer brake spider, S-cam bracket vibration, or that the trailer brake backing plate feels loose. These are all clear signs of cracks and wear in the trailer spider plate. Let’s look at them up close!
1. Worn Shoes on One Side
This is often the first sign of a failing brake spider plate. If one shoe wears faster than the other on the same axle end, the plate may be bent, warped, or have elongated mounting holes. Misalignment lets the shoes drag on the drum, reducing braking force and accelerating wear. These are classic symptoms of a crack in a trailer spider plate.
What to look for: During trailer brake service, compare inner and outer shoe wear side by side. If the difference is significant, inspect the spider before blaming the cam or slack adjuster.
2. Too Much Movement in the S-Cam Shaft
The S‑cam pushes brake shoes outward during braking and rides in bushings supported by the spider plate. When the bushing bores wear or the spider housing cracks, the shaft becomes sloppy, creating noisy, uneven braking and vibration. These are early S‑cam bracket vibration symptoms that indicate the plate or bushings need replacement.
What to look for: Move the camshaft by hand; any noticeable side or end movement, or grease leakage at the bushing, means the plate should be inspected or replaced.
3. Anchor Pin Holes are Elongated or Oval-Shaped
Anchor pins keep brake shoes in place through round, tight holes in the brake spider, allowing the braking force to transfer to the axle. Most often, excessive heat or pressure makes these anchor holes wear into an oval shape or crack. This causes the brake to float, leading to brake chatter and uneven retraction. The result mimics a trailer brake backing plate loose problem.
What to look for: Pull the anchor pin and measure the hole; if wear exceeds 0.015 inches out of spec or the hole is visibly cracked, replace the trailer spider plate.
4. Visible Rust, Corrosion, or Structural Cracks
Spider plates are constantly exposed to road salt, moisture, and heat. Light surface rust is normal, but flaking metal, brown trails near pinholes, or visible cracks indicate structural damage. These trailer spider plate crack symptoms require immediate replacement, not welding.
What to look for: Inspect around mounting flanges, bushings, and anchor pin holes for cracks or corrosion staining, as these are high-stress zones.
Important:
Do not weld or patch a cracked spider plate. A repaired crack cannot be trusted under braking force, and it will not pass DOT inspection. Replace it.
5. Failed DOT Inspection
This is often the first sign of a failing brake spider plate. If one shoe wears faster than the other on the same axle end, the plate may be bent, warped, or have elongated mounting holes. Misalignment lets the shoes drag on the drum, reducing braking force and accelerating wear. These are classic symptoms of a crack in a trailer spider plate.
A worn or cracked spider plate may not show tell-tale signs, but it quietly pushes brake geometry out of spec, increases pushrod travel, and causes uneven brake application across axles. FMCSA regulations require brakes to apply evenly and stay properly adjusted. A failing spider plate violates that standard and can result in an out-of-service citation.
What to look for: Inspect brake spiders every 90 days, at every shoe replacement, and after any wheel-end overheating event. Do not wait for a citation.
Critical Inspection Points:
- 90-Day Checks: Inspect the spider plate and S-cam bracket quarterly for FMCSA compliance. California carriers must also meet the CHP-enforced state BIT program requirements.
Note:
California Assembly Bill 3278 moved lighter single vehicles with a GVWR under 26,001 lbs to the standard 12-month federal inspection schedule, while commercial trailers must still follow the 90-day cycle.
- Brake Service: Check for cracks, distortion, or weld damage at every shoe replacement or after any overheating event.
- Major Defects: Ovalized anchor pin holes or excessive camshaft movement are CVSA out-of-service violations that will ground your vehicle.
- Repairs: Replace a failing spider plate immediately. Do not weld or patch it, as it will not pass DOT inspection.
Remember, a bent brake spider plate on the trailer that lets the shoe geometry drift will trigger inspection failures and potentially put your trailer out of service.
What Causes Trailer Spider Plate Failure Symptoms?
The spider plate on your trailer’s axle housing is an essential component that ensures healthy braking performance. Whether it’s excessive noise from a trailer brake spider or visible cracks, you need to act immediately.
| What you see or hear | Why is it happening |
| Brake shoes are wearing thin on one side | The plate is bent. Just like a door hanging crooked on its hinges, the shoes are hitting the drum at an angle instead of flat. |
| The brakes are dragging or staying stuck | The holes are stretched. The holes for the pins have worn into egg shapes, so the shoes get caught and cannot snap back. |
| A loud clunk when you hit the brakes | The spider plate is loose or cracked. The metal foundation is buckling under pressure because the welds have failed. |
| The trailer takes longer to stop | The S-Cam is wobbly. The plate is too weak to hold the camshaft steady, letting it twist sideways instead of pushing the shoes out. |
| Rusty dust or visible hairline cracks | Road salt and heavy loads. Years of chemical exposure and hauling the maximum weight have simply tired the metal out until it starts to break. |
Welding a worn brake spider is only a quick fix. If you notice the above signs, buying a new trailer brake spider plate is a long-term solution that keeps your brake shoe assembly in place
How to Fix a Failing Trailer Spider Plate
The trailer spider plate and axle components are crucial for proper wheel alignment, structural integrity, and braking performance.
Watch: Step-by-step process for removing a worn spider plate and installing a new one.
1. Clean the Trailer Spider Plate
Start by cleaning the existing spider plate and the surrounding axle area. Remove dirt, rust, grease, and debris so accurate measurements can be taken before removal. A clean surface also helps identify any damage or wear around the axle tube.
2. Measure the Damaged Spider plate
Before removing the old spider plate, measure the distance from the seal face to the anchor pin holes on the spider plate. This measurement is critical because it helps position the new spider plate correctly and keeps the brake components aligned properly.
3. Remove the Damaged Spider Plate
Use a cutting torch to carefully remove the damaged spider plate from the trailer axle. Cut along the weld around the spider plate and work in short sections, without damaging the axle tube. Once the weld is cut, carefully remove the old spider plate.
4. Clean the Axle Tube OD for New Spider Plate Installation
After removal, thoroughly clean the outside of the axle tube. Remove any leftover weld, rust, and dirt so the surface is smooth. This helps the new spider plate fit correctly and ensures a strong weld.
5. Insert the Sleeve into the New Spider Plate and Tack Weld
Insert the sleeve into the new spider plate and apply two tacks to hold it in place. This keeps the parts aligned before installing the assembly into the axle tube.
6. Insert the Spider Plate into the Axle Tube
Carefully install the new spider plate onto the axle tube. Make sure the spider plate side bore is properly aligned with the S-cam tube or bushing hole, depending on your S-cam type.
7. Use the Spider Plate Installation Tool for Alignment
Use the spider plate installation tool to align the spider plate on the axle tube. The tool keeps the plate in the correct position and prevents it from shifting during measurement and tack welding.
8. Measure the New Spider Plate
Measure from the face of the seal to the anchor pin holes on the new spider plate. Compare it against your original measurement to confirm the plate is sitting in the correct position before installation.
9. Tack Weld the Spider Plate
Once alignment is confirmed, apply two tacks on the back of the spider plate at the 12 o’clock and 6 o’clock positions. This holds it in place before final welding.
10. Remove the Installation Tool
After the spider plate is securely tack-welded and aligned properly, remove the installation tool from the axle assembly.
11. Perform Final Welding
Complete the final weld passes on the following areas:
- One pass from the axle tube to the sleeve
- One pass from the sleeve to the spider plate
- One pass on the back side of the spider plate
Proper welding technique and penetration are important to ensure the strength, durability, and long-term performance of the installation.
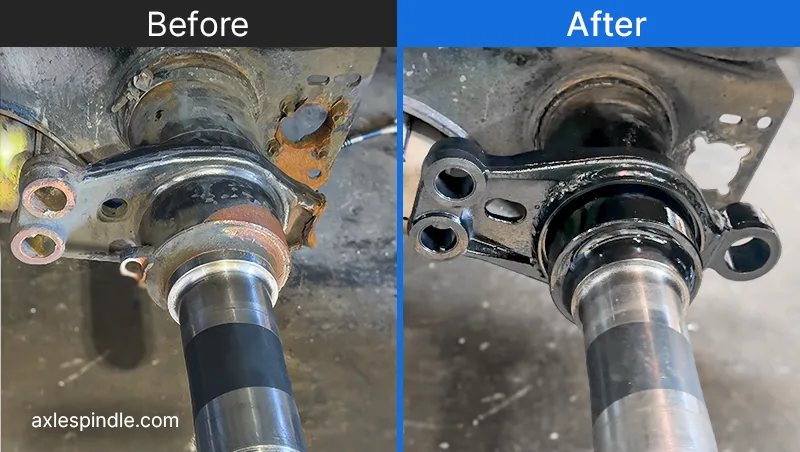
Get the Right Tools For Trailer Spider Plate Installation
The spider plate is only as good as the installation behind it. That is why we built two products specifically for this job.
Trailer Brake Spider Plate
Heavy-duty cast iron, built to OEM specs and compatible with 4707 and 4710 brake shoes.
Available in the following configurations:
- S-Cam Type: With Tube 4707, With Tube 4710, With Bushing 4707, With Bushing 4710
- Axle Tube OD: 5 inch, 5 3/4 inch
- Supports anchor pins, S-cam bushings, and brake shoes under extreme braking forces

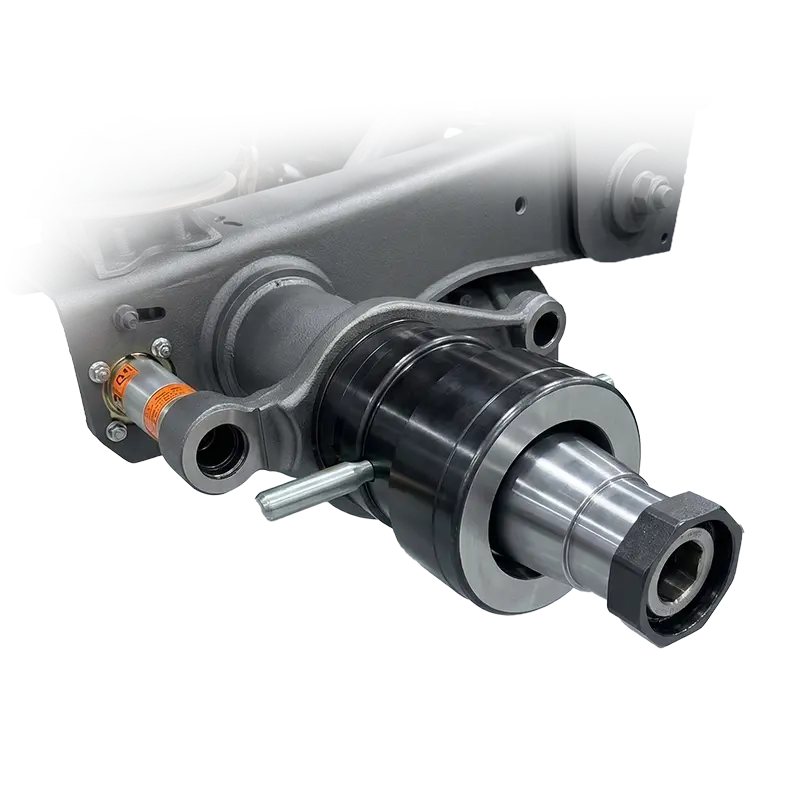
Trailer Spider Plate Installation Tool
An adjustable clamping system that holds the spider plate in perfect alignment during installation. Compatible with Meritor, Hendrickson, SAF Holland, Dexter, and other major commercial trailer axles. Built for high-torque, heavy-duty shop use.
- Works on new, worn, and rusted axle tubes
- Reduces human error and prevents warping during fastening
- Minimal instruction needed; most mechanics can operate it straight away.
Frequently Asked Questions
How do I know if my trailer spider plate needs replacing?
When your anchor pins appear egg-shaped, you see wear on the brake shoes or rust on the mounting pins, it is time to replace your old trailer spider plate. While driving, you will also notice clunking noises and a heated wheel hub assembly. A bent spider plate on a trailer causes the brake hardware to shift, resulting in screeching.
Can I weld a cracked spider plate instead of replacing it?
Replace it, don’t weld it. A crack means the metal is already overburdened, and welding only seals the surface, leaving the surrounding weak metal vulnerable. Do not weld a cracked spider plate on a heavy-duty axle. The spider plate keeps your brake shoes aligned. A bad repair there leads to weak stopping power and poor braking performance.
How long does a spider plate replacement take?
Trailer spider plate replacement typically takes one to three hours. On light-duty and utility trailers, the job is straightforward and can usually be done in about an hour with the right tools. Heavy-duty repairs tend to run the full two to three hours, especially when the plate is welded on, the axle is worn, or other components are damaged.
Having a complete brake hardware kit on hand, including anchor pins, S-cam bushings, and the associated fasteners, keeps the job moving without delays.
Do I need a special tool to install a trailer spider plate?
A trailer spider plate installation tool for heavy-duty trailers helps hold the plate in the correct position and prevents micro-misalignment during fastening. The tool holds the plate in the exact position while you fasten or weld it, preventing any drift or angle that would throw off your brake shoe alignment. Without it, even a small shift during installation can cause the brake repair to underperform from day one.
How often should trailer spider plates be inspected?
Federal regulations require a comprehensive evaluation of commercial trailer brake components at least every 12 months under the FMCSA Minimum Periodic Inspection Standards. In California, the California Highway Patrol BIT Program mandates a documented safety check every 90 days.
While California Assembly Bill 3278 recently transitioned lighter single vehicles under 26,001 lbs GVWR to the standard annual federal schedule, commercial trailers operated in combination configurations remain fully subject to the strict 90-day mechanical inspection cycle.
How to fix dragging trailer brakes?
Start by checking the slack adjuster and making sure the brakes are not over-adjusted. If the shoes are not releasing fully, inspect the return springs, S-cam, and bushings for wear or seized components. A worn or misaligned spider plate can also cause uneven shoe contact, so check that too before reassembling.
Conclusion
Taking care of your spider plates is one of those maintenance tasks that is easy to put off because the trailer keeps rolling even when something is quietly going wrong. By the time the symptoms are obvious, you are usually looking at more damage and more downtime than if you had caught it early. The good news is that this is not a complicated repair. Know what to look for, have the right parts on hand, and take your time during installation. Your brakes are only as reliable as the hardware behind them, and a solid, properly aligned spider plate ensures your shoes make full contact, your cam turns as it should, and your trailer stops as it should. Staying on top of it during your regular maintenance intervals is the simplest way to keep small issues from turning into costly ones.
Share